luni, 12 august 2013

Project: Restoring A SONY WM-EX652 Walkman - Contact Cleaning For "Gum Bar" Battery.

I was trying to measure the amount of Play time having both batteries installed on the Walkman, as I saw some information saying that it should reach almost 40h.
In my case it was no longer than 10h, so at some moment I assumed the charger is not working and the "gum bar" is not charged.
I tried to use it without the AA battery extension and it was not working at all.
After measuring the "gum bar" battery I realized that something else is causing this low amount of Play time, maybe a broken or corroded contact.
I removed one of the face plates of the Walkman, as you can see below:


After removing the screws marked with red color I was able to reach the battery housing:


After a closer look I saw the corroded contact:


In order to clean it I used an old tooth brush and contact cleaner, below you can see the result:


Now the unit is working on both batteries, used together or separated. What is left to be done is to count how many tapes I will be able to listen without charging the batteries.

vineri, 9 august 2013

TEAC A-3440: Data Information And Technical Characteristics.

Specifications:
  • Track System: 4-Channel Multi-Track Simul-Sync;
  • 3 Motors: 
    • 1 DC-Servo Capstan Motor;
    • 2 Eddy Current Induction Reel Motors;
  • 3 Heads:
    • Erase;
    • Record/Sync;
    • Playback;
  • Reel Size:
    • 26.5 cm (10-1/2");
    • 18 cm (7");
  • Tape Speed:
    • 38 cm/s (15 ips)  (±5%);
    • 19 cm/s (7-1/2 ips) (±5%);
  • Wow and Flutter (NAB Weighted):
    • 0.04% at 15 ips;
    • 0.06% at 7-1/2 ips;
  • Frequency Response (overall):
    • 25 - 24000 Hz (±3dβ/0 VU: 40 - 22000Hz) at 15ips;
    • 25 - 22000 Hz (±3dβ/-10 VU: 40 - 20000Hz) at 7-1/2ips;
  • Signal-to-Noise Ratio (overall): 55dβ (3% THD level, weighted);
  • Harmonic Distortion (overall): 0.8% at normal operating level;
  • Stereo Channel Separation:45 at 1 kHz;
  • Rewind/Fast Forward Time: 140s for 1800ft;
  • Inputs:
    • 4 Line: 60mV/50kΩ;
    • 4 Mic: 0.25mV (-72)/600Ω or more;
  • Outputs:
    • 4 Line: 0.3V/load impedance: 10kΩ or more;
    • 1 Headphone Jack: 8Ω;
  • Power Requirement:
    • 100/117/220/240V AC, 50/60Hz (EX Model);
    • 220V AC, 50Hz (EUR Model);
    • 240V AC, 50Hz (UK/AUS Model);
    • 117V AC, 60Hz (USA/CND Model);
  • Power Consumption: 125W;
  • Dimensions (W x H x D):
    • 445 x 523 x 235mm;
    • 17-1/2" x 20-1/2" x 9-1/4"
  • Weight: 25kg (55lbs) net;
  • Supplied Accessories:
    • Input Output Connection Cords;
    • RE-1002 Empty Reel;
    • NAB Reel Hub Adapters;
    • Spicing Tape;

sâmbătă, 3 august 2013

SONY WM-EX652: Data Information And Technical Characteristics.

Supplied Accessories:
  • Battery Case;
  • Stereo Headphones with Remote Control;
  • Clip (which I don't have, I don't know how it looks like);
  • Battery Charger;
  • AC Plug Adapter (except European, Arabian and Korean Models);
  • Rechargeable Battery (NC-6WM, 1.2V, 600mAh, Ni-Cd);
  • Carrying Pouch (don't have it either);
  • Rechargeable battery carrying case;
General:
  • Power Requirements:
    • 1.5V;
    • Rechargeable Battery;
    • One R6 (AA) Battery;
  • Dimensions (W/H/D):
    • 108.9 x 79.6 x 23.9mm;
  • Weight:
    • 140g;
    • 225g rechargeable battery, headphones with remote control and cassette inclusive;
Tape Section:
  • Frequency Response (Dolby NR Off):
    • Playback: 20 - 18000Hz;
  • Output:
    • Headphones;
    • Load Impedance: 8 - 300Ω;
  • Power Output:
    • 5mW + 5mW (16Ω);

miercuri, 24 iulie 2013

Project: Restoring A SONY WM-EX652 Walkman - Headset replacement.

Because of the time passed, the rubber (black insulation) of the headset became very stiff; the feel of it was also a little bit strange. In the same time, the acoustics of the headset were not so great.
As a consequence, I tried to replace them with a new set, in-ear model.
First step was to identify a suitable headset with 16ohms impedance. I found this model: SONY MDR-E11LPB.
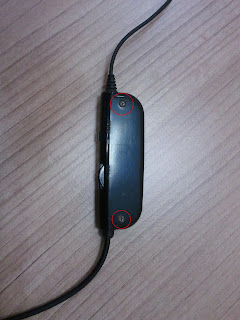
Then I was opening the remote control, as you can see below:


I was unsoldering the old headset and attached the new one:


Now the headset looks like new and it works like new:


During this procedure I learned, from a colleague of mine who helped me, an important lesson: before soldering the new wires, which were covered with special insulation paint, need to be cleaned by a process of “boiling” in soldering cleaning solution. After this process they can be soldered on the circuit board, otherwise, the soldering compound is not creating enough retention on the board, the wires can’t be soldered.

sâmbătă, 20 iulie 2013

Project: Restoring A SONY WM-EX652 Walkman.

I was planning for some time to get a walkman, I have a lot of tapes and some times I appreciate listening a good tape.
I found over internet, using Okazii.ro, this model: SONY WM-EX652.
You can see below some pictures, and I will get back latter with details and technical data:


The headset comes together with a remote control and there is also a “gum bar” battery and one AA battery extension.

sâmbătă, 15 iunie 2013

Proiect: Restaurare Magnetofon Rostov 105 - Inchiderea Proiectului.

Titlul spune aproape totul, pentru moment ma opresc aici in ceea ce priveste activitatea mea legata de magnetofonul Rostov 105. Am sa continui insa cu celelalte proiecte incepute si care se afla in diverse stadii de realizare, inca mai caut cateva unelte fara de care nu se poate lucra eficient si corect (un osciloscop de exemplu).
Magnetofonul care a fost subiectul acestui proiect are acum un proprietar nou, un prieten care si-a dorit un Rostov 105 la fel de mult pe cat mi l-am dorit eu. Dorinta mea s-a implinit acum un an si jumatate, a lui ieri. L-am dat cu drag pentru ca stiu ca va fi bine ingrijit si folosit. Am fost impresionat sa vad bucuria pe care i-am facut-o atunci cand l-am adus si sa sa-mi dau seama ca ne plac magnetofoanele din aceleasi motive: intelegem complexitatea lor tehnica, apreciem sunetul cald si complet si ne ajuta sa ne indeplinim dorinte vechi ramase constant in memorie.


Am primit in schimb un deck ONKYO Integra TA-2750. Am sa revin cu date tehnice, dar pana atunci pot spune ca sunt impresionat de silentiozitatea cu care lucreaza si calitatea sunetului redat. Am primit si multe casete cu muzica buna, acum ascult Queen - A Day At The Races, si mi-am reamintit de ce imi place Queen.


In imaginea de mai sus sunt cele doua deck-uri din colectie: ONKYO Integra TA-2750 si TEAC A-480, primul fabricat in 1991 iar al doilea in 1978.

vineri, 7 iunie 2013

Project: Restoring a TEAC RC-70 Remote Control Unit.

Well… there is some time past since my last post, but this is because I was looking for my next item to add to my collection.
This new item arrived few days ago, from US; found on Ebay… it is the TEAC RC-70 Remote Control Unit for my TEAC A-3440 Reel-To-Reel unit. It took me several months to find one in relative good shape and with a small price.
You can see below how the unit arrived:


Cable needs cleaning, dirty connector, and dirty switch box with a paper label on it:


In order to clean it up I used cleaning solution based on orange peal extract and a soft brush.
The switch box can be open very easy by removing the four side screws.


You can see below how the unit looks like after cleaning:


miercuri, 27 martie 2013

Project: Restoring A Teac RX-9 DBX Unit.

Few weeks ago I have managed to get the newest part of my TEAC line, a module I was looking for some time: TEAC RX-9 DBX Unit. Like for the A-480 deck, I will keep the naming convention: “Project: Restoring…” but in this case also there is not too much to restore, only a new set of wood side panels, as the unit came without these panels.
This unit was specifically designed for use with the TEAC A-3440.
I will come back with a different post in order to present the technical details.
You can see below the unit as it originally came:


Clean and complete inside:


Now you can see below the unit with the new wood side panels:


And finally, the panels after painting:


Overall, it looks like below:


sâmbătă, 16 martie 2013

Accessories: BASF Hobby-Box Magnetic Tape Splice Kit.

I would like to present now something I was looking for some time: BASF Hobby-Box Magnetic Tape Splice Kit.
I was able to get this kit with help from a friend from Greece.
You can see below some pictures and kit content:


  • Tray with splicer (levers made from non-magnetic steel) and 10m splicing tape 6.1mm wide;
  • 1 demagnetized blade (I have received 5 more blades with this kit);

  • Leader tape 25m each red, white, green;
  • 20 switch foils 15cm each;
  • 1 signing pencil;
  • 3 tape clips;
  • Spool labels 20 each red and green.

duminică, 3 martie 2013

Project: Restoring a Teac A-480 Stereo Cassette Deck - General Cleaning.

As promised in the previous post, I will present today what I did for cleaning the deck. I used for this operation a regular dust brush; few cue tips and orange cleaner.
To open the deck you have to unscrew the four mounting screws:


Now the deck looks like this:


The metal cover can be removed by hand, there are no more screws holding it, by pushing it backwards and then lifting it up:


Now you have access inside to clean the dust or rubber remains from the belts:


Next parts which needs cleaning from time to time are the buttons and knobs:


Also, the front panel and the tape cover can be cleaned for a look like “new” condition. Here it is important to use a cleaner that is not aggressive, you can easily remove the writings from the plate and the effect will be very disappointing. I asked around for a soft cleaner and I was pointed to use a natural cleaner based on extracts from orange fruit.
To remove the panel you have to remove first the cassette cover by ejecting the cassette tray and pulling the cover up and out:


Then you have to unscrew several screws to remove the front panel, as you can see below:


In the final stage you can also clean all the other parts left: VU Meters, Function and Direction buttons, tape counter, deep cleaning of pinch roller and heads:


Basically this should be all.
To assemble the unit back, you have to follow the above steps in reverse.

miercuri, 20 februarie 2013

Project: Restoring a Reel-To-Reel Tape Player/Recorder: TEAC A-3440 - New set of plastic feet installed on the unit.

You can see in the previous post some pictures of the unit, and you can see that it is missing its feet. You can also see the picture below to understand the problem:


There was also missing the feet from the back panel:


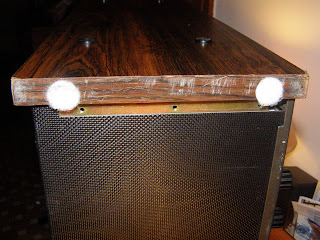
I would like to show you below some of the side effects of not using the factory feet, beside stability issues:


The wood panels are scratched and chipped at the bottom.
With help form a friend from United States that is supporting me with parts or equipment hard to find in my area, I was able to find a complete set of feet, you can see below:


At the end my Teac A-3440 looks like below:


One of my next tasks will be to repair the power cord strain relief, the present one doesn't look to good, and I will do it as soon as I will be able to find the original.